


.JPG)
.JPG)


.jpg)


.JPG)


 Swayne's Farm on the right of the German positions, this was held by a reinforced rifle company, and largely unaffected by the detonation of a huge mine in this area.
 One of the few intact German pillboxes, this one guarded the communication trenches between the farm and the village
 The forward slopes of the ridge on the right-centre of the German line
 Part of the second wave of New Zealand troops leaving their start line
 Germans in the ruins of the village, extreme German right of this position
 Some of the defenders of Swayne's Farm. This was an important position as it guarded the very thinly held German right
 New Zealand support units fire at the village from extreme range; Lewis Guns were less useful in this role
 6" Newton Trench Mortar attempting to suppress the German pillbox to the left of the village
Third wave of New Zealand troops heading in the general direction of the farm area
 German support position on the extreme left of their line, although elevated they were too far from the general fighting area to provide much support
Damaged German platoons in the forward village area, they suffered quite heavily to continual allied 4.5" howitzer fire that was pre-registered on their position

One of the few supporting tanks lumbering its way up the forward slopes towards the village proper

Extreme German left with tank and infantry held up by a pillbox
 Pressure mounts on the farm defenders. They were holding out quite well until a tank arrived and started smashing things up; as it did historically.
 More Kiwis directly in front of the village. The German casualties in the fore were the defenders of the frontline trenches that were obliterated by the mine explosion, only a couple of damaged platoons made it back into the village
 German commander attempting to rally a section of the village defenders
 And direct what was left of his meagre reserves into the forward battle area
 This is from about turn six, most of the farm position has been cleared with just two German platoons stubbornly holding out
 A single tank and two or three infantry companies on the very edge of the village
 Same time and place, just showing more New Zealanders moving into the village where house to house fighting was going on
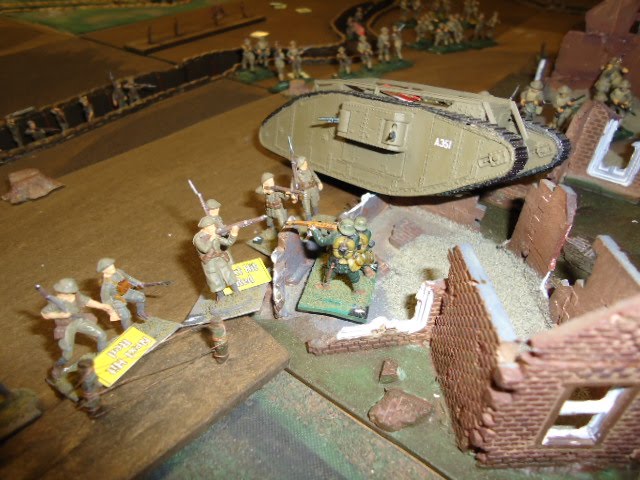 This German company (or what was left of it) held the front left hand corner of the village long after the rest of it had been over run
 The tanks attracted a lot of small arms fire which allowed most of the infantry units to arrive in the village area largely intact
This tank broke down early on and had to suffice itself with a machine gun duel with the pillbox for the rest of the game
 Kiwis damaged and a little shaken but firmly in control of this section of the village, they had no trouble beating off the token German counter attacks in this area
 German LMG platoon attempts to stop the New Zealand infantry flanking this part of the village
 Demoralised German units attempt to rally towards the rear of the village, crucially this was one of the few areas safe from support artillery fire
 The Germans attempted counter attack to recapture Swayne's Farm is stopped dead by the damaged tank and its supporting infantry, this was the last of the small German reserve force available for such tasks
 German command units linking the farm area with the village right are over run
 Slightly damaged New Zealand troops begin to move into the village from the now vacant Swayne's Farm area
 We played nine out of the ten turns allocated for this game, the Germans didn't really have enough undamaged anything to bother playing the last, and 3/4 of the village was in allied hands by this stage in any case. The house to house fighting still going on was not going to affect the outcome, so we called it at this stage. Good game.
What a great AAR!!!And great, figures, terrain, and, and. . .
ReplyDeleteI love it Al!!!!
T.
What a nice gameboard and what a brilliant game report. Thank you Al for sharing with us!
ReplyDeleteWelcome boys, the only thing missing was Paul!
ReplyDeleteSplendid effort, you and David must be happy with the results. Yep I am ashamed by my absence but have resolved to take a hard pill and get over it!
ReplyDeleteNice to see more Great War games - a much overlooked period!
ReplyDeleteGreat looking table and figures. I really like WWI AAR. Keep them coming.
ReplyDeleteSounds like it was a very enjoyable and exciting way to spend a few hours - thanks for the report.
ReplyDeleteAnother really enjoyable battle report with some great pics! I'm impressed with the realistic way the rules seem to play out for what is a rsther difficult period for wargames.
ReplyDeleteIan
Thanks Ian, about the only place the rules get tricky is when fighting actually in a trench where LOS is 2" Otherwise they suit the scale pretty well
ReplyDeleteCheers
Al, this is brilliant stuff all round - love the figs and terrain in particular, mate. Tell me, what rule set did you use?
ReplyDeleteNice one,
Monty
Epic!!!
ReplyDeleteAgain, thank you all. The rules we use for WW1 are a mixture of Command Decision Over The Top, with some CD3 and practical 'house rules'. They work well for large scale actions.
ReplyDelete